"Listen," my mother would say, cocking an ear at the big mixing bowl. "There's a certain sound the mixture has to make when you pour it." She would ladle up another cup of the fragrant sweet custard mix and let it trickle back into the bowl. "No, see it's too heavy a sound. We need to add more milk." Those were days of adding flour and milk until there was "enough;" cooking the pie or cake or roast until it was "done." The recipe my mother used for pumpkin pies had been taught to her (not written down for her) by my father's spinster Aunt Viola, who in her turn, had it from great-great-greats-grandmothers long before.

By the time my mother was teaching me how to make the pie recipe, we were the only family I knew who still cooked up anything close to the flakey crusted, delicately flavored confection. Pumpkin pies were in everyone's houses in the late fall, and the first time a friend offered me some pumpkin pie, I was delighted, because Mom was busy with fall plantings and deer hunting and couldn't always be cajoled into making the dessert. What a surprise I had, and a disappointment, too, for the friend's mother's pie was dull brownish and reeked of cloves and allspice. Even slathered with Cool Whip, it was a major effort to choke down out of politeness.
"Mom, I had a piece of pumpkin pie. It was terrible. It wasn't anything like ours."
"They probably used cow pumpkins left over from Halloween," she suggested. "We only use Eating Pumpkins."
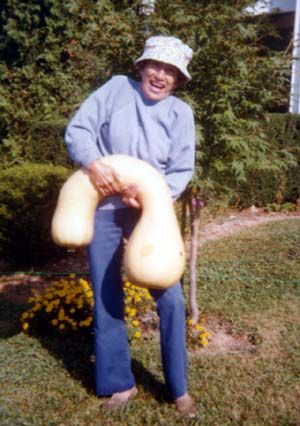
Eating Pumpkins (pronounced EET-n PUNK-ins) were a fossil variant of the Butternut Squash. Also called Gooseneck Pumpkins, they had a small "bell" or seed cavity, and necks of solid "meat" sometimes 2 1/2 feet long and five inches thick. People in the old days would can the pumpkin meat so as to have it for pies for a year. One pumpkin patch could keep a neighborhood in pie stuff until the following harvest. The picture that accompanies this article is of my mother with an outstanding specimen that she grew in her nursery from seeds harvested from a stud pumpkin we traveled all the way to a farm in Carlisle to buy, almost an hour away. Pumpkins were serious business.
"What kind of pumpkin does your mother use?" I asked, the next time I was offered a piece of pumpkin pie.
"She gets it out of a can, how would I know?" cynically replied my host.
"No, thank you."
If asked to bake a batch of pumpkin pies (the recipe was for three pies at a time), my mother would invariably reply, "You cook the pumpkin, I'll make them. I am not cooking pumpkin." Now, since she was the artist in this matter, it was only fair that she made that demand. Cutting up a pumpkin the size of a goat and peeling it (well, chopping the tough skin off is a better description) and cooking it took up an entire evening. Pumpkin skins are sticky on the inside, rather nasty to have all over your hands; cooking the pumpkin in the pressure cooker required attention in the kitchen until it was done, even though each batch only took 10 minutes. And then you had to wait for it to cool enough to put through a "ricer," which was like a sieve to remove the tough tasteless fibers of pumpkin centers.
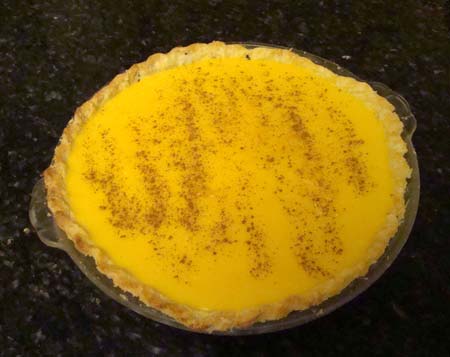
Then Mom the Artist took over, and she added the three (and some) cups of pumpkin, the heaping tablespoon of flour, the pinch of salt, the two cups of sugar, 2 eggs, and the milk -- until it sounded right trickling from the ladle (about 3 1/2 cups). After sprinkling the tops with cinnamon to make a pattern like the face of the moon, she baked the pies at 400 degrees ... until they were done, and silly as it sounds, sometimes they took half an hour and sometimes an hour, for no apparent reason, and neither Mom nor Dad worried about that variation in procedure. "Until Done" was -- "Enough." Three tender, sweet, bright yellow-orange pies would grace the table and cold back porch, and we would dine with joy on pie for breakfast, snack, and dessert after supper. They didn't last long at all. I can remember my father and his friend Bill not even waiting until the pies chilled before knocking off a whole pie between them in a matter of minutes.
Now if Mom was an artist when it came to the pies (and they hardly ever "didn't come out right") she was a fanatic when it came to pie crust. She counted it as a personal goal to have the most toothsome, flaky, from-scratch pie crust ever encountered in a pie. And she also intended that I learn how to produce a pie crust that no one would ever have to saw at to cut a pie. I bought into the apprenticeship, and watched like a hawk as she used a wire pastry cutter to work chilled Crisco into the flour, and added a minimal amount of water to make the crumbs hold together. We rolled out the dough quickly, so that it wouldn't get warm, and after laying the piecrust out across the pie pan, fluted the edges using thumb and second knuckle of the index finger, aiming at beauty and evenness.
Times change. Mom died in 2010, so she doesn't have to bother with artistic pies any more. Dad is gone,too, so there's no one to cook the pumpkin up, anyway. The recipe for the light and heavenly pie has gone west with me.
A child of my times, I did some experimenting with modern products and came up with a recipe that tastes the same as the heirloom pies and is a lot more reliable. When it comes to pumpkin pies, I like standardization of perfection. So does the family.
I live in California now, and no one out here knows what an Eating Pumpkin is. After experimenting with Butternut squash as a substitute (no good, there's a nasty bitter taste) I found that what is called "Banana Squash" has the flavor closest to what I remember. In addition, it has the added benefit of being almost completely free of tough fibers, so shoving the cooked pulp through a colander or a ricer is no longer a sticky job that must be done. I toss the cooked pumpkin into my food processor or blender and give it a whirl for a minute. Perfect consistency.
Just as it was when we lived back East, my pumpkin pie is THE pie guests ask me to serve, and hosts ask me to bring. The recipe I use is for one pie, but I always end up making at least two anyway, so folks don't fight over the last pieces. Our household is dominated by people with lactose intolerance, so I substitute soy milk or almond milk and the recipe works just fine with that, too.
Are you ready for a mess? Here we go, then.
I use deep-dish 9 1/2 inch pie plates by Corning, by the way. This recipe will overflow little standard pie plates. That's okay, though, you can always let the extra chill in custard bowls. Mmmmmm!
Hardware:
- Pie plate, with pie crust in it.*
- Microwave safe mixing bowl. (A big one -- heating custard swells!)
- Whisk
- Measuring cups
- Measuring spoons
- Spatula

Foodstuffs for pie filling:
- 1 1/4 Cups cooked pumpkin
- Pinch of salt
- 4 1/2 Tablespoons corn starch
- 1 Cup sugar (or 3/4 Cup crystalline fructose, which I use instead of sugar in everything)
- 3 Cups milk or almond milk or soy milk (Vitasoy Classic Original works great)
- 4 Egg yolks, lightly beaten
- 2 Tablespoons butter, cut into little pieces
Mix in microwave safe mixing bowl the pumpkin, salt, corn starch, sugar, and milk. Whisk that stuff up well, until it's not at all lumpy. Microwave on HIGH for 8 minutes, stopping to stir at 6 minutes, 4 minutes, and 2 minutes.
Remove from the microwave oven, and pour about 1/3 cup of the filling into the egg yolks, beating constantly. Pour egg yolk mixture back into main mixing bowl, whisk thoroughly, and return to the microwave for 4 minutes on HIGH, stopping to stir at 2 minutes and 1 minute.
Remove from microwave, add butter, stir until melted, and pour into baked pie crust. Sprinkle cinnamon across top of pie. Chill until firm. (2 hours or so)
*Lots of people don't make their own pie crusts anymore, and that's fine. But Mom would beat me with a broom if I didn't include our crust recipe, just in case.
- 1 1/2 cups of unbleached flour. (Don't use that bleached stuff, darn it, would you eat chloroxed potatoes?)
- Pinch salt (Have you ever noticed that all the old recipe-makers are salt-pinchers?)
- 1/2 Cup shortening
- Ice water, about 5 Tablespoons
Simple, right? Guess again. The trick is to use minimal effort to cut the shortening into the flour (a pastry blender makes this easier than using two knives) until the mix resembles coarse cornmeal. Then you add the ice water, a tablespoon at a time, until the dough just hangs together. It should never look slippery or moist.
Save yourself a lot of grief and roll it out between sheets of waxed paper. Trust me.
Prick the shell all over with a fork, then bake it at 450 degrees for about 15 minutes. Now it's ready for the filling.
***
Just in case you were wondering, I made two of those pies yesterday afternoon. 28 hours later, there are only a couple pieces left.

12/25/2013
12:44:11 AM